/BERGASMS/GBA/03

..

03/08/22

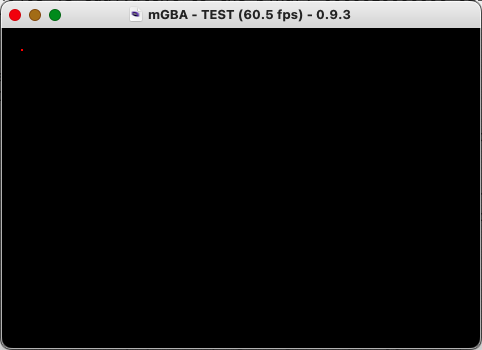
Current Goal: I will write the bare minimum amount of code to display a red pixel onto the GBA screen using Zig

OK, today has been all about understanding the linker file (remember that thing i said i wasn't going to bother understanding, well..) and the asm that starts the fun. I have been reading up on GNU Linker Files, on the ARM instruction sets and the GBA architecture in general. Basically before even running a game there is some work that is done to get the device into the state ready to run the actual game ROM. Spicy topics like interrupts and things like that. The end result though is a fairly minimalist chunk of code that zig can build into a working .gba file that runs on the emulator. Before i go through it piece by piece here are the files in full. First up is the main.zig file.

const root = @import("root");
const std = @import("std");

pub const Header = packed struct {
    romEntryPoint: u32,
    nintendoLogo: [156]u8,
    gameName: [12]u8,
    gameCode: [4]u8,
    makerCode: [2]u8,
    fixedValue: u8,
    mainUnitCode: u8,
    deviceType: u8,
    reservedArea: [7]u8,
    softwareVersion: u8,
    complementCheck: u8,
    reservedArea2: [2]u8,

    pub fn setup() Header {
        comptime var header = Header{
            .romEntryPoint = 0xEA00002E,
            .nintendoLogo = .{
                0x24, 0xFF, 0xAE, 0x51, 0x69, 0x9A, 0xA2, 0x21, 0x3D, 0x84, 0x82, 0x0A, 0x84, 0xE4, 0x09, 0xAD,
                0x11, 0x24, 0x8B, 0x98, 0xC0, 0x81, 0x7F, 0x21, 0xA3, 0x52, 0xBE, 0x19, 0x93, 0x09, 0xCE, 0x20,
                0x10, 0x46, 0x4A, 0x4A, 0xF8, 0x27, 0x31, 0xEC, 0x58, 0xC7, 0xE8, 0x33, 0x82, 0xE3, 0xCE, 0xBF,
                0x85, 0xF4, 0xDF, 0x94, 0xCE, 0x4B, 0x09, 0xC1, 0x94, 0x56, 0x8A, 0xC0, 0x13, 0x72, 0xA7, 0xFC,
                0x9F, 0x84, 0x4D, 0x73, 0xA3, 0xCA, 0x9A, 0x61, 0x58, 0x97, 0xA3, 0x27, 0xFC, 0x03, 0x98, 0x76,
                0x23, 0x1D, 0xC7, 0x61, 0x03, 0x04, 0xAE, 0x56, 0xBF, 0x38, 0x84, 0x00, 0x40, 0xA7, 0x0E, 0xFD,
                0xFF, 0x52, 0xFE, 0x03, 0x6F, 0x95, 0x30, 0xF1, 0x97, 0xFB, 0xC0, 0x85, 0x60, 0xD6, 0x80, 0x25,
                0xA9, 0x63, 0xBE, 0x03, 0x01, 0x4E, 0x38, 0xE2, 0xF9, 0xA2, 0x34, 0xFF, 0xBB, 0x3E, 0x03, 0x44,
                0x78, 0x00, 0x90, 0xCB, 0x88, 0x11, 0x3A, 0x94, 0x65, 0xC0, 0x7C, 0x63, 0x87, 0xF0, 0x3C, 0xAF,
                0xD6, 0x25, 0xE4, 0x8B, 0x38, 0x0A, 0xAC, 0x72, 0x21, 0xD4, 0xF8, 0x07,
            },
            .gameName = [_]u8{0} ** 12,
            .gameCode = [_]u8{0} ** 4,
            .makerCode = [_]u8{0} ** 2,
            .fixedValue = 0x96,
            .mainUnitCode = 0x00,
            .deviceType = 0x00,

            .reservedArea = [_]u8{0} ** 7,
            .softwareVersion = 0,
            .complementCheck = 0x00,
            .reservedArea2 = [_]u8{0} ** 2,
        };

        comptime {
            var title: []const u8 = "TEST";
            for (title) |value, index| {
                header.gameName[index] = value;
                header.gameCode[index] = value;
            }

            var maker: []const u8 = "00";
            for (maker) |value, index| {
                header.makerCode[index] = value;
            }

            var complementCheck: u8 = 0;
            var index: usize = 0xA0;

            var computeCheckData = @bitCast([192]u8, header);
            while (index < 0xA0 + (0xBD - 0xA0)) : (index += 1) {
                complementCheck +%= computeCheckData[index];
            }

            var tempCheck = -(0x19 + @intCast(i32, complementCheck));
            header.complementCheck = @intCast(u8, tempCheck & 0xFF);
        }

        return header;
    }
};

export var gameHeader linksection(".gbaheader") = Header.setup();
export fn GBAMain() linksection(".gbamain") callconv(.Naked) noreturn {
    asm volatile (
        \\.arm
        \\.cpu arm7tdmi
        \\
        \\mov r0, #0x12
        \\msr cpsr, r0
        \\ldr sp, =__sp_irq
        \\mov r0, #0x1f
        \\msr cpsr, r0
        \\ldr sp, =__sp_usr
        \\add r0, pc, #1
        \\bx r0
    );

    root.main(); 
}

pub inline fn naiveVSync() void {
    while (REG_VCOUNT.* >= 160) {} // wait till VDraw
    while (REG_VCOUNT.* < 160) {} // wait till VBlank
}

pub const REG_VCOUNT = @intToPtr(*volatile u16, @ptrToInt(MEM_IO) + 0x0006);
pub const VRAM = @intToPtr([*]align(2) volatile u16, 0x06000000);
pub const MEM_IO = @intToPtr(*volatile u32, 0x04000000);
pub const REG_DISPCNT = @intToPtr(*volatile u16, @ptrToInt(MEM_IO) + 0x0000);
pub fn main() noreturn {
    REG_DISPCNT.* = 0x0403;

    while (true) {
        naiveVSync();
        VRAM[10 * 240 + 10] = 0x001F;
    }
}
 
Next is the linker .ld file

MEMORY {
    rom	: ORIGIN = 0x08000000, LENGTH = 32M
    iwram	: ORIGIN = 0x03000000, LENGTH = 32K
    ewram	: ORIGIN = 0x02000000, LENGTH = 256K
}

ENTRY(__text_start)

OUTPUT_FORMAT("elf32-littlearm", "elf32-bigarm", "elf32-littlearm")
OUTPUT_ARCH(arm)

__text_start = ORIGIN(rom);
__iwram_top = ORIGIN(iwram) + LENGTH(iwram);
__sp_irq = __iwram_top - 0x060;
__sp_usr = __sp_irq - 0x0a0;

SECTIONS
{
    . = __text_start;

    .text :
    {
        KEEP(*(.gbaheader))
        KEEP(*(.gbamain)) 
        . ALIGN(4);
    } >rom = 0xff 
}

 
and finally the Zig build file build.zig

const Builder = std.build.Builder;
const CrossTarget = std.zig.CrossTarget;
const builtin = std.builtin;
const std = @import("std");

const GBALinkerScript = "./gba.ld";

const gba_thumb_target = blk: {
    var target = CrossTarget{
        .cpu_arch = std.Target.Cpu.Arch.thumb,
        .cpu_model = .{ .explicit = &std.Target.arm.cpu.arm7tdmi },
        .os_tag = .freestanding,
    };
    target.cpu_features_add.addFeature(@enumToInt(std.Target.arm.Feature.thumb_mode));
    break :blk target;
};

pub fn build(b: *std.build.Builder) void {
    const exe = b.addExecutable("FirstTry", "src/main.zig");

    exe.setTarget(gba_thumb_target);
    exe.setLinkerScriptPath(std.build.FileSource{ .path = GBALinkerScript });
    exe.setBuildMode(builtin.Mode.ReleaseFast);
    _ = exe.installRaw("FirstTry.gba", .{});

    b.default_step.dependOn(&exe.step);
}
At a high level, Zig runs the build file, the build file tells it to compile main.zig and link it with gba.ld, and the compilation process for main.zig generates the code/symbols that are stuffed into the gba.ld file, and all of that comes out the pipe at the other end as FirstTry.gba, which is a binary set up in the right format for the GBA emulator to understand.

The Zig Build File: Breakdown

The first part of the build file is super simple. It is just importing useful parts of the Zig ecosystem and defining the path to the linker file (which is in the same directory so not super complex).

const Builder = std.build.Builder;
const CrossTarget = std.zig.CrossTarget;
const builtin = std.builtin;
const std = @import("std");

const GBALinkerScript = "./gba.ld";
            
The next part defines the target for our executable. Zig gives you the power to target all sorts of platforms out of the box, it's one of the more killer features.

const gba_thumb_target = blk: {
    var target = CrossTarget{
        .cpu_arch = std.Target.Cpu.Arch.thumb,
        .cpu_model = .{ .explicit = &std.Target.arm.cpu.arm7tdmi },
        .os_tag = .freestanding,
    };
    target.cpu_features_add.addFeature(@enumToInt(std.Target.arm.Feature.thumb_mode));
    break :blk target;
};
In here we are saying the architecture is thumb (The GBA can use thumb or ARM, thumb is generally understood to be quicker).

  ARM Mode     ARM7TDMI 32bit RISC CPU, 16.78MHz, 32bit opcodes (GBA)
  THUMB Mode   ARM7TDMI 32bit RISC CPU, 16.78MHz, 16bit opcodes (GBA)
We are saying the model is an ARM7TDMI, The ARM7TDMI is a 32bit RISC, it's good for decent performance with low power consumption which is just what you want for a handheld. The os tag is I am fairly sure saying that this is not one of the big 3 OS types and is something more custom. Finally we have the build function.

pub fn build(b: *std.build.Builder) void {
    const exe = b.addExecutable("FirstTry", "src/main.zig");

    exe.setTarget(gba_thumb_target);
    exe.setLinkerScriptPath(std.build.FileSource{ .path = GBALinkerScript });
    exe.setBuildMode(builtin.Mode.ReleaseFast);
    _ = exe.installRaw("FirstTry.gba", .{});

    b.default_step.dependOn(&exe.step);
}
Firstly we are defining our executable and indicating where the source is, setting the target for the executable and telling zig where the custom linker script is. We set the build mode to ReleaseFast which tells Zig to build our code lean and mean and not to include any of the nice debugging sugar. This is a fact of life because we are deploying to a device which has limited debugging features that are probably accessed in a different way than we are used to. Finally we say what the output file is named and then make the default step (which is always run) depend on our exe building step. This makes sure it gets run.

The ld File: Breakdown

I had to do a bit of research to get the gist of the ld script syntax. I still only have a dabbling level of understanding so this is a somewhat incomplete explanation of what is going on. First up the memory section.

MEMORY {
    rom	: ORIGIN = 0x08000000, LENGTH = 32M
    iwram	: ORIGIN = 0x03000000, LENGTH = 32K
    ewram	: ORIGIN = 0x02000000, LENGTH = 256K
}
This defines the regions of memory by naming them, defining the address they start at, and specifying how long they extend for. In this case we have iwram, which is 32K of internal (on chip) working ram. We have ewram, which is 256K of external (on board) working ram. Finally we have rom, which is 32MB of memory that lives on the cartridge. Next up we have a metadata sort of section

ENTRY(__text_start)

OUTPUT_FORMAT("elf32-littlearm", "elf32-bigarm", "elf32-littlearm")
OUTPUT_ARCH(arm)

__text_start = ORIGIN(rom);
__iwram_top = ORIGIN(iwram) + LENGTH(iwram);
__sp_irq = __iwram_top - 0x060;
__sp_usr = __sp_irq - 0x0a0;
This indicates the starting point for our program to run from. In this case called __text_start, the format and architecture that the data is in, and then some other symbols. In this case we have the __sp_irq which is the stack pointer to the interrupt handler. We have __sp_usr which is the stack pointer for the user. Both of these are defined as being offsets from the internal working ram. We also indicate that the start of our program is at the start of the rom, which makes sense. Lastly we have the sections

SECTIONS
{
    . = __text_start;

    .text :
    {
        KEEP(*(.gbaheader))
        KEEP(*(.gbamain)) 
        . ALIGN(4);
    } >rom = 0xff 
}
In here, the '.' is shorthand for 'current position in the linked program', so we are starting everything off by setting that variable to the __text_start, which is the start of our ROM. We then define our first section, which is called .text. In here we put in the symbols .gbaheader and .gbamain, which are defined in our code in main.zig. So essentially the very first things that will show up in our .gba rom is the header and then the main code. We tell the linker we want it aligned on a 4 byte boundary (the gba needs this) and to pad any remaining with 1's (eg, repeat 0xFF untill we are done).

The Main File: Breakdown

I won't bother discussing the Header code, it basically just sets up the title for the ROM, some checksum info, and a heap of bytes that is the Nintendo logo. There is nothing too interesting about it at this point and in reality i could replace the whole struct with the final generated bytes and just dump that into the top of the linker file. The interesting stuff is as follows.

export var gameHeader linksection(".gbaheader") = Header.setup();
This is exporting our header into the section .gbaheader, which we saw in the linker. At a terribly simplistic level it can be interpreted to say 'take all the compiled binary you get from compiling Header.setup() and stick that binary into the .gbaheader part of the linker file'. We then do a similar step with the 'guts' of the program.

export fn GBAMain() linksection(".gbamain") callconv(.Naked) noreturn {
    asm volatile (
        \\.arm
        \\.cpu arm7tdmi
        \\
        \\mov r0, #0x12
        \\msr cpsr, r0
        \\ldr sp, =__sp_irq
        \\mov r0, #0x1f
        \\msr cpsr, r0
        \\ldr sp, =__sp_usr
        \\add r0, pc, #1
        \\bx r0
    );

    root.main(); 
}
In this case we are not exporting a var but a function, simplistically we are saying 'all the binary you get from compiling the function GBAMain should be stuck into the .gbamain part of the linker file'. We have some naughty syntactic sugar here, where we are marking the callconv as being Naked. The Zig docs indicate the following

// The naked calling convention makes a function not have any function prologue or epilogue.
// This can be useful when integrating with assembly.
So basically don't add any fluff to the function, just the bare bones thanks. Again, this makes sense when you consider the target. Then we get into some fun asm code, what this is doing is telling the CPU where the stack pointers are for the interrupt handlers, remember we defined these in the linker file previously. It's a heads up, hey, you can use the ram here for that. We then set the program counter and away we go to the main function.

pub const MEM_IO = @intToPtr(*volatile u32, 0x04000000);
pub const REG_VCOUNT = @intToPtr(*volatile u16, @ptrToInt(MEM_IO) + 0x0006);
pub inline fn naiveVSync() void {
    while (REG_VCOUNT.* >= 160) {} // wait till VDraw
    while (REG_VCOUNT.* < 160) {} // wait till VBlank
}

pub const VRAM = @intToPtr([*]align(2) volatile u16, 0x06000000);
pub const REG_DISPCNT = @intToPtr(*volatile u16, @ptrToInt(MEM_IO) + 0x0000);
pub fn main() noreturn {
    REG_DISPCNT.* = 0x0403;

So after all of that, this is basically the program. We define some pointers to the useful registers that let us do VSYNC and run a super simple vsync program. We define hooks to the Video RAM, and we define a hook to REG_DISPCNT which is the display controller. This was the thing we discussed in the last article. We know that we need to be operating in mode 3, and we need to enable the second background layers visibility. Once we do this, anything we write into the VRAM will be reflected onto the screen. The magic number 0x0403 does this for us.

                                   <- read it this way
0x0403 is equivalent to the binary 0000010000000 011
This maps as follows.


Val    Bit   Expl.
011(3) 0-2   BG Mode                (0-5=Video Mode 0-5, 6-7=Prohibited)

0      3     Reserved / CGB Mode    (0=GBA, 1=CGB; can be set only by BIOS opcodes)
0      4     Display Frame Select   (0-1=Frame 0-1) (for BG Modes 4,5 only)
0      5     H-Blank Interval Free  (1=Allow access to OAM during H-Blank)
0      6     OBJ Character VRAM Mapping (0=Two dimensional, 1=One dimensional)
0      7     Forced Blank           (1=Allow FAST access to VRAM,Palette,OAM)
0      8     Screen Display BG0  (0=Off, 1=On)
0      9     Screen Display BG1  (0=Off, 1=On)
1      10    Screen Display BG2  (0=Off, 1=On)
0      11    Screen Display BG3  (0=Off, 1=On)
0      12    Screen Display OBJ  (0=Off, 1=On)
0      13    Window 0 Display Flag   (0=Off, 1=On)
0      14    Window 1 Display Flag   (0=Off, 1=On)
0      15    OBJ Window Display Flag (0=Off, 1=On)
Finally, we setup the game runloop with the following code
 
    while (true) {
        naiveVSync();
        VRAM[10 * 240 + 10] = 0x001F;
    }
}
Which means forever more we will perform a vsync, and then set the pixel at 10,10 (remember, screen width is 240) to the colour RED! The GBA uses 5 bit colour stored as a 16 bit colour, with 5 bits per RGB, so 0x001F is no bits for blue and green and full red.
Behold, a running GBA rom that puts a red pixel on the screen.
So this has been very educational. I feel fantastic about it. It's really nice to see stuff on the screen finally, even if it is just a silly red pixel. My physical cartridge arrived today as well, so maybe tomorrow I will try to get the pixel onto my actual GBA device.

New Goal: I will get my red pixel rom working on a physical Gameboy Advance